Screencasting with Linux
You will find here the tools and explanations to screencast on Linux, that is, to record your computer screen while you speak into a microphone. This is useful to make video tutorials or online courses.
Examples of my screencasts may be found on my YouTube channel.
download code view github repo
On this page:
Introduction
This document describes how I screencast on Linux. You will need to have some knowledge of the command line.
The steps we need to follow are:
- record both your screen and your voice,
- mix them into one file,
- edit with a video editor, to insert titles and remove speech issues (like “er...”, “oups...”, repetitions, etc.).
I usually don't record everything in one shot, I record smaller chunks and then concatenate them into one video later, as we will see.
How to record audio and video
Our goal here is to record audio and video at the same time, because making a voice-over (recording the video, and later the audio) is complicated and time consuming.
Setting the area of the screen to record
Our first goal is to define the area of the screen to record, in terms of width, height and position (how far from the left and top screen borders).
Two possibilities: (1) Use two monitors: one for your notes and controls and one as the recorded area; (2) Record a specific area of your screen, the rest being used for notes and controls.
Using two monitors
Using two monitors is the best solution since you can store your notes, slides, windows, etc. on a separate monitor.
Let's say you have two monitors, like this:
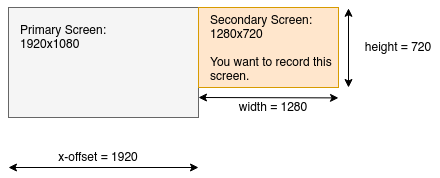
Let's say you want to record the secondary monitor in red (it's best to not record the primary monitor, since the task bar will be on it, and you don't want to record the taskbar). The area to record is thus the second monitor:
- width: the width of your monitor (in pixels), for example 1280 for a 1280x720 monitor,
- height: the height of your monitor (in pixels), for example 720 for a 1280x720 monitor,
- the position (x-offset from the left border and y-offset from the top border) of the your monitor. If your monitors are laid out has in the previous picture, then the y-offset is 0 (because it is at the top), and the x-offset (from the left) is the width of your primary monitor, for example 1920 for a 1920x1080 monitor.
Now you can define your geometry: width x height + x-offset + y-offset, so 1280x720+1920+0 in our example.
Recording only a smaller area of your screen
If you don't have two monitors and don't want to record your entire monitor, you will need to specify an area of the screen to record, for example a window.
I have written the program drawframe to draw a (by default red) frame around a specific area. You may want to leave the frame during the whole recording, so you know exactly what is the area of the screen which is been recorded, and you can move your notes and other windows around.
To run drawframe:
if you want to record an area of 1280x720 pixels at x- and y-offset of 100 pixels. Use the -h switch to get other formats.
You can also specify a custom area and a custom offset (for example a 800 by 660-pixel area, at x- and y-offet 50 and 50):
Use the -w option to set the width (thickness) of the frame.
If you want to get the size and position of an open window, use the get_window_size_n_position.sh script:
Then click on the window you want to record, and you will get the size and position of the window, for example: 1198x830+32+21. You can use this output with drawframe to check and draw a frame.
Setting the audio
Plug your microphone into your computer, and check the audio. You may use pavucontrol to select the correct microphone and adjust the volume, if needed. You can make a test with Audacity.
Recording audio and video
I prefer to record audio and video in separate files, so I can process them separately (especially to remove noises from the audio before mixing it with the video).
Short version
I use ffmpeg to record both audio and video. The general syntax is as follows:
ffmpeg -framerate 15 -video_size <WIDTH>x<HEIGHT> \
  -f x11grab -i :0.0+<X-OFFSET>,<Y-OFFSET> \
  -f alsa -ac 2 -i pulse \
  -map 0:0 -vcodec libx264 -qp 0 -preset ultrafast video.mp4 \
  -map 1:0 -acodec libmp3lame audio.mp3
With this, you will have a video.mp4 file (without audio) and an audio.mp3 file (of course without video).
For example, to record a second right 1820x720 monitor (see the example above), use:
ffmpeg -framerate 15 -video_size 1280x720 \
  -f x11grab -i :0.0+1920,0 \
  -f alsa -ac 2 -i pulse \
  -map 0:0 -vcodec libx264 -qp 0 -preset ultrafast video.mp4 \
  -map 1:0 -acodec libmp3lame audio.mp3
To stop the recording, just press Ctrl-C, it's ok.
Lengthy details and adjustments
You can tweak the quality of the audio and video files, and make other adjustments. You can skip this section if you're ok with the default settings.
You can add some quality to the mp3 (see ffmpeg.org with the option:
You can record in different formats. For the audio, you may want to record raw data:
but in this case you must include the -crf 0 option (constant rate frame) in the video line:
(this one or the ones below), otherwise the audio will be cut and the two files (audio and video) will not have the same length. If you use mp3, you don't need to do it.
For video, you can try one of the following:
-map 0:0 -vcodec mpeg4 video.mp4 # this is mpeg
-map 0:0 -vcodec libx264 -crf 0 -qp 0 -preset ultrafast video.mp4 # h264
-map 0:0 -vcodec libx264 -qp 0 -preset ultrafast video.mp4
-map 0:0 -vcodec libx264 -crf 0 video.mp4
-map 0:0 -vcodec libx264 -crf 0 video.mkv
The best is to record in h264 in mp4 (Youtube doesn't allow you to upload mkv).
Here is a bash script to make some tests (just copy that in a new directory in /tmp/vid for example):
rm *.mp4 *.mkv *.wav *.mp3
ffmpeg -framerate 15 -video_size 1280x720 \
   -f x11grab -i :0.0+1920,0 \
   -f alsa -ac 2 -i pulse \
   `#-map 0:0 -vcodec mpeg4 video.mp4` \
   `#-map 0:0 -vcodec libx264 -crf 0 -qp 0 -preset ultrafast video.mp4` \
   -map 0:0 -vcodec libx264 -qp 0 -preset ultrafast video.mp4 \
   `#-map 0:0 -vcodec libx264 -crf 0 video.mp4` \
   `#-map 0:0 -vcodec libx264 -crf 0 video.mkv` \
   `#-map 1:0 -acodec pcm_s16le audio.wav` \
   -map 1:0 -acodec libmp3lame audio.mp3
A script to record several files in a row
I don't usually record everything in one shot. I split my script into chunks and sometimes start again over and over because of speech problems (“er”, “oups”, repetition, forgetting what I want to say, etc.). So I end up with several chunks: some go directly to the trash, and I assemble the other ones in a video editor later.
The (Perl) script record_videos_in_a_row.pl allows you to do this:
It will ask you to press Enter to start recording, and Ctrl-C to stop, and wait for the next recording. Each time you press Enter and Ctrl-C, it will create two files named:
01.mp3and01.mp4,02.mp3and02.mp4,03.mp3and03.mp4,- etc.
Mixing audio and video
Clean the audio
You may want to edit the audio, for example normalizing the sound and reducing the noise. I use the audacity for that. You just have to import each .mp3 file, use the noise reduction (and maybe the normalization) filter and save the file back to the disk.
Merging audio and video
Now we want to merge the audio and video into one file:
Note that if you have decided to save the audio in raw format (.wav) rather than in .mp3, use:
You will need to do this for each file 01.mp3 and 01.mp4, 02.mp3 and 02.mp4, etc., so you can use a loop:
for f in *.mp4:
do
   fn=$(basename -s .mp4 $f)
   ffmpeg -i $fn.mp4 -i $fn.mp3 -vcodec copy -acodec copy $fn-merged.mp4
done
Use the merge.sh script to do that:
Editing in a video editor
Now you can edit the merged file with Openshot or Shotcut (for example). These are video editor where you can cut and concatenate your file, remove parts and add title, images, etc.
Export settings
Here the options I have used to export my videos. Note that Shotcut has a profile for Youtube.
Profile (HDV 720 24p 1280x720):
- resolution:
1280x720(width x height) - aspect ratio:
16:9 - pixel ratio:
1 - frame rate:
15 frames/sec - interlaced:
no(oryadif) - scan mode:
progressive - interpolation:
bilinear
Video:
- format:
mp4 - codec:
libx264 - GOP:
30 frames - B frames:
2 - rate control:
average bitrate - bit rate / quality:
256 kb/s
Audio:
- codec:
libvo_aacenc(oraacdepending of the software) - sample rate:
44100 Hz - channel layout:
stereo - rate control:
average bitrate - bit rate / quality:
128 kb/s
What if you prefer a voice-over
You may want to edit the video, then record the voice over in high quality with audacity, without keyboard strokes. Just open audacity, and play the video while recording. You must be synchronized! To merge, use the video editor (but this might re-encode the video, which is lossy and time-consuming), or one of the above commands.
You may want to edit the video and export it with the original sound (as a guide), or without it. Then record a new voice over and edit the new sound in audacity, then export it. If you have exported the original sound, you will need to replace it by the new sound: